c. Create container repository
In this section, you will create a container repository on Amazon ECR and create a Docker container image.
Start Cluster
After the update completes, be sure to start the cluster.

Preliminary
From the pcluster manager console connect to the cluster via h. Connect to the Cluster.
Since the HPC Cluster existed prior to post-install script, you will need to manually install Docker and Singularity on the head node of the HPC Cluster.
# Install Docker
sudo amazon-linux-extras install -y docker
sudo usermod -a -G docker ec2-user
sudo systemctl start docker
sudo systemctl enable docker

# Install Singularity
sudo yum install -y singularity
Reload the environment to have the correct linux permissions.
exec sudo su -l $USER
Configure the AWS Region on the head node of the HPC Cluster to be used by the AWS CLI.
export AWS_REGION=$(curl --silent http://169.254.169.254/latest/meta-data/placement/region)
aws configure set default.region ${AWS_REGION}
1. Create the container repository
In this step, you will create a repository named isc22-container using the Command Line Interface (CLI) in Amazon ECR.
Amazon ECR is a fully managed container registry offering high-performance hosting, so you can reliably deploy application images and artifacts anywhere.
CONTAINER_REPOSITORY_NAME="isc22-container"
aws ecr create-repository --repository-name ${CONTAINER_REPOSITORY_NAME}
2. Authenticate Docker with the Amazon ECR Repository
For Docker to interact with Amazon ECR, you will need to authenticate to the container registry of your AWS account.
To facilitate the Docker authentication, the commands provided below will:
- List the container repository and extract the URI of the container repository
- Extract the container registry URI: It looks like this aws_account_id.dkr.ecr.region.amazonaws.com
- Login Docker to Amazon ECR container registry
CONTAINER_REPOSITORY_URI=`aws ecr describe-repositories --query repositories[].[repositoryName,repositoryUri] | grep "/${CONTAINER_REPOSITORY_NAME}" | tr -d '"'`
ECR_URI=`echo $CONTAINER_REPOSITORY_URI | sed "s%/${CONTAINER_REPOSITORY_NAME}%%g" | tr -d '"'`
aws ecr get-login-password | docker login --username AWS --password-stdin ${ECR_URI}
3. Create the Docker container
You will start by creating a directory that will host the container creation files, named container in the shared directory.
CONTAINER_WORKDIR="/shared/container"
mkdir -p $CONTAINER_WORKDIR
Let create a Python “Hello World” script example.
cat > $CONTAINER_WORKDIR/hello-world.py << EOF
#!/usr/bin/env python3
# Hello World Python Script

print('Hello World from my Container!')
EOF
Now, create a Dockerfile that contains the commands to assemble a container image with our Python “Hello World” script.
cat > $CONTAINER_WORKDIR/Dockerfile << EOF
FROM public.ecr.aws/amazonlinux/amazonlinux:latest

RUN yum install -y python3
ADD hello-world.py /

CMD python3 /hello-world.py
EOF
Let’s build the container. Since it is the first and latest version of the container, you will tag it with v1 and latest tags.
cd $CONTAINER_WORKDIR
docker build  -t ${CONTAINER_REPOSITORY_URI}:v1 -t ${CONTAINER_REPOSITORY_URI}:latest .
You have built your container image successfully, you will push the local container image to the container repository you created earlier.
docker push ${CONTAINER_REPOSITORY_URI}:v1
docker push ${CONTAINER_REPOSITORY_URI}:latest
4. Run the container on the head node
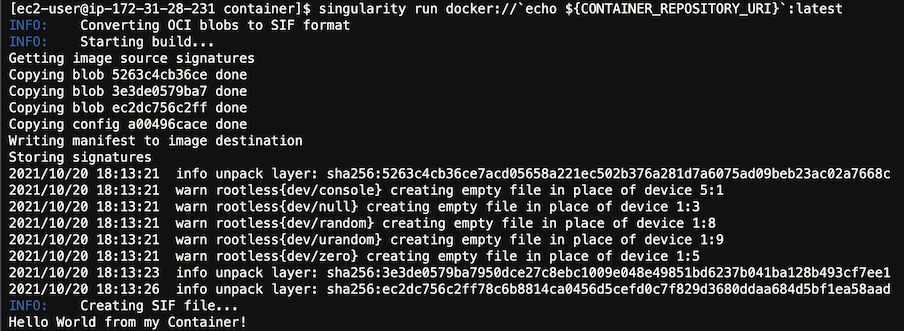
After bulding your container image, you check that it works correctly by running the container using singularity.
export SINGULARITY_CACHEDIR=/shared/singularity-cache
singularity run docker://`echo ${CONTAINER_REPOSITORY_URI}`:latest
The output will be similar to this: